


Retrofit Your Old Sprinkler System
Is your old sprinkler system stuck in the past? If you're still walking outside to twist a manual timer dial or watching your water bill climb because your system can't sense rain, it's time for an upgrade. The good news: retrofitting your old sprinkler system with modern wireless sprinkler technology doesn't mean starting from scratch. With today's smart controllers and innovative pipe fittings, you can transform your outdated system into an intelligent sprinkler system that saves water, time, and money.
Can I Retrofit My Current Sprinkler System with a Smart Controller Without Replacing the Entire Setup?
Yes—and that's exactly what makes retrofitting so appealing. You can upgrade to a smart irrigation system without replacing your underground pipes, valves, or most sprinkler heads. The typical retrofit involves swapping your old controller for a wireless sprinkler system controller, replacing underperforming sprinkler heads, and optionally converting some zones to drip irrigation. Your existing valve infrastructure, lateral pipes, and properly functioning heads can stay in place, saving you thousands of dollars compared to a complete system replacement.
What Are the Advantages of Converting My Existing Sprinkler System to a Smart System?
Old irrigation controllers waste resources because they lack the technology that prevents overwatering. Without weather sensing, Wi-Fi control, or zone-specific programming, traditional systems water on schedule regardless of rainfall, soil moisture, or seasonal needs.
As controllers age, another problem emerges: electrical component degradation. Over time, capacitors, relays, and timing circuits in old sprinkler controllers can drift out of specification. The controller display might show a programmed 15-minute run time, but the zone actually runs for 12 or 18 minutes. This invisible inaccuracy compounds water waste because you can't see the problem—the timer looks like it's working correctly, but your zones are either being underwatered or overwatered without your knowledge.
The cost of outdated systems:
- Eroded spray patterns: Water is abrasive, and over years of operation, old style sprinkler heads develop wear inside their nozzles and changes the pattern.
- No weather response: Traditional timers water on a fixed schedule and can't adjust for weather conditions, running even during rainstorms
- Hidden timing drift: Aging electrical components may cause zones to run shorter or longer than programmed
- Higher bills: Inefficient watering and inaccurate run times directly impact your monthly expenses
- Time drain: Manual adjustments mean trips outside to reprogram
- Poor coverage: Beyond erosion, aging sprinkler heads may have damaged nozzles, broken pop-up stems, or clogged filters
When you upgrade your sprinkler system to a Wi-Fi sprinkler system controller, you gain precision control from anywhere. Smart controllers use weather data to automatically adjust watering schedules, and you can monitor and control every zone from your phone.
Planning Your Retrofit: Assessment and Strategy
Before you start, evaluate your current system to determine what needs upgrading:
System Assessment Checklist:
- Count your zones: How many valves, stations, or zones does your irrigation system have? This determines your controller size
- Test each zone: Run every zone to identify which sprinkler heads need replacement
- Check water pressure: Confirm your system operates between 30-80 PSI
- Identify opportunities: Which zones would benefit from converting sprinklers to drip irrigation for gardens, trees, or shrub beds?
- Evaluate coverage: Note areas with poor or excessive coverage. This is where you might add or remove sprinkler heads
This assessment tells you whether you need a simple controller swap or a more comprehensive upgrade that includes new heads and zone expansion.
How Do Smart Irrigation Controllers Improve Water Efficiency in Home Sprinkler Systems?
Weather-Based Scheduling: Traditional timers water on a fixed schedule. Smart controllers access real-time local weather data including rainfall, temperature, humidity, and wind. When rain is detected, watering pauses automatically. During cooler periods, watering duration decreases and during warmer weather watering duration increases.
Zone-Specific Optimization: Smart controllers let you configure each zone with specific parameters: soil type (clay, loam, sand), sun exposure (full sun, partial shade, full shade), slope, plant type, and more. The controller then calculates precise watering schedules for each zone independently. Your sunny front lawn might need 20 minutes three times per week, while your shaded side yard gets 12 minutes twice per week—all managed automatically.
Real-Time Monitoring and Adjustment: With a smart controller sprinkler system, you receive notifications about watering events, can review historical data, and make instant adjustments from anywhere. Noticed some brown spots? Plants looking overwatered? Just open the app and adjust the zone settings. This ongoing optimization ensures you use exactly the water your landscape needs—no more, no less.
EPA WaterSense certified controllers like the B-hyve XR have been independently tested to deliver at least 20% water savings compared to conventional irrigation controllers, with many homeowners reporting 30-50% reductions in outdoor water use.
How Do I Convert My Existing Sprinkler System to a Smart System?
Converting your existing system to a smart irrigation system involves four main steps: upgrading your controller, replacing underperforming heads, optionally converting zones to drip irrigation, and calibrating your new system. Here's the complete process:
Choosing the Best Lawn Irrigation Controller: B-hyve XR
The controller is the brain of your irrigation system, and selecting the right replacement sprinkler controller makes all the difference. Orbit's B-hyve XR Smart Controllers stand out as the easiest to install and most capable wireless sprinkler systems available.
Why B-hyve XR is ideal for retrofits:
The B-hyve XR line offers two models to match your system:
- 57985 B-hyve XR 8-Station - For systems with up to 8 zones
- 57995 B-hyve XR 16-Station - For larger properties with up to 16 zones
Key advantages for retrofit projects:
- EPA WaterSense certified: Qualifies for rebates in many cities and water districts
- Weather-smart technology: Automatically adjusts watering based on local conditions
- Indoor/outdoor rated: Install anywhere without needing an additional cabinet
- Compatible with existing valves: Works with 24 VAC valves from all major brands
- Pump start relay support: Can control a pump and valve simultaneously
- Dual connectivity: Bluetooth for local control or use Wi-Fi (2.4 GHz or 5 GHz) for remote access worldwide
The Retrofit Process: Step-by-Step
Safety First: Call Before You Dig
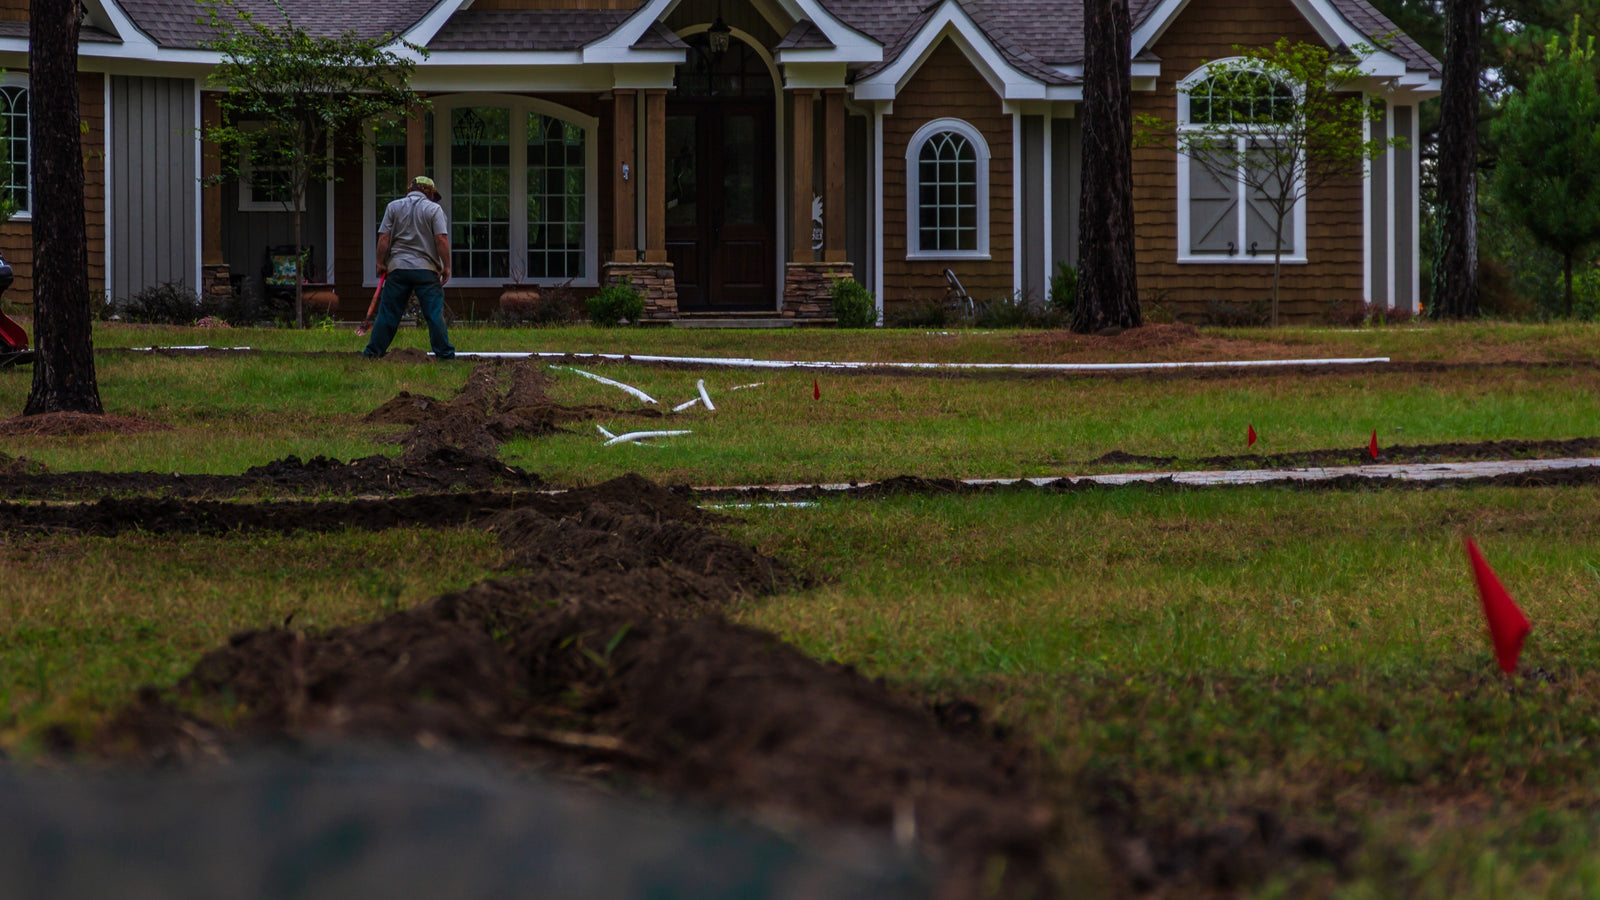
Before breaking ground, call 811 to have underground utilities marked. This free service protects you from hitting electric, gas, water, or communication lines. Use colored flags to mark utility locations clearly.
Step 1: Replace Your Old Sprinkler Controller
Installing a new sprinkler controller is the easiest part of any retrofit, especially with B-hyve XR's user-friendly design.
Controller installation process:
- Photograph your old wiring: Take clear photos of which wire connects to which terminal
- Label each wire: Use masking tape to mark each wire with its zone number
- Turn off power: Unplug or shut off the circuit breaker powering your old controller
- Remove the old timer: Disconnect all wires and remove the mounting screws
- Mount the B-hyve XR: The controller includes a magnetic access panel that makes wire access simple. Mount it in the same location or choose a new spot (indoor or outdoor)
-
Connect the wires:
- Attach the White common wire to the "C" terminal
- Connect each zone wire to terminals 1-8 (or 1-16)
- If you have a pump, connect the pump start wire to "PUMP"
- Download the B-hyve app before powering up: Available free on iOS and Android—get it ready on your smartphone
- Power on and pair immediately: Have your app open and ready to pair then plug-in your B-hyve XR. The B-hyve XR uses Bluetooth for easy initial setup, then connects to your Wi-Fi network (If you want to).
- Configure your zones: Name each zone (front lawn, side yard, flower bed, etc.) and set basic parameters
The B-hyve app walks you through setup with simple prompts, and the entire controller installation typically takes 30-45 minutes even for first-time users.
Pro tip: If you're planning to add a sprinkler zone, now is the perfect time. Simply run a new wire from your new valve to the next available terminal on your B-hyve XR controller.
Step 2: Test and Flag Problem Areas
With your new controller installed, run each zone for 5-10 minutes and observe.
- Flag or mark sprinkler heads that aren't popping up fully
- Note heads with broken nozzles or poor spray patterns
- Identify areas with gaps in coverage where you might need to add sprinkler heads
Use different colored flags for different issues to keep everything organized during repairs.
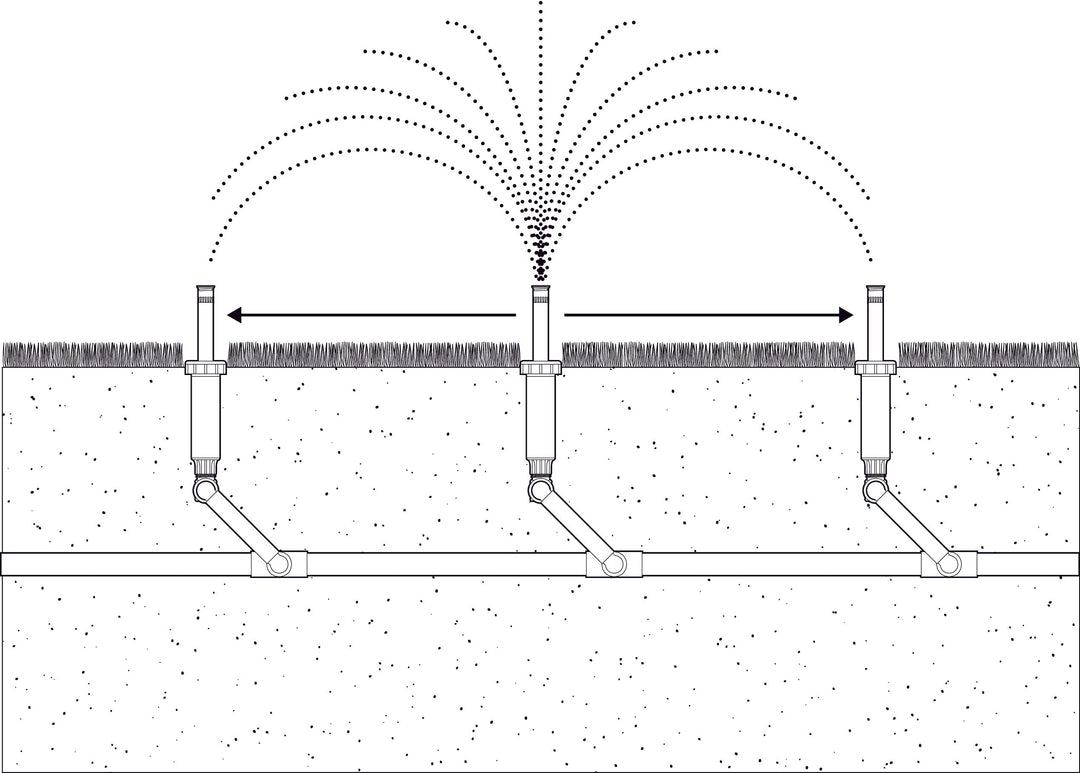
Step 3 (optional): Replace Sprinkler Heads and use Blu-Lock Swing Joints
This is where Orbit's innovation shines. Traditional risers can break when stepped on, driven over, or bumped. Swing joints eliminate all of that and Blu-lock is ideal for swing joints.
What makes Blu-Lock revolutionary:

Blu-Lock is Orbit's proprietary push-to-connect pipe and fitting system. Instead of measuring, cutting, and wrapping PVC risers with thread tape, you simply push Blu-Lock pipe into Blu-Lock fittings—no tools and no tape. The connections seal instantly and withstand up to 100 PSI, yet you can still remove and reuse fittings when needed using the built-in release collar (for 1/2 in.) or optional removal tool (for 3/4 in. and 1 in.).
Creating Blu-Lock swing joints (1/2 in. system):
For each sprinkler head you're replacing or adding:
- Expose the lateral line: Dig down 6-8 inches to access your existing lateral pipe
-
Create a connection point:
- If converting from PVC riser: Remove the old riser at the tee or elbow
- If adding a new head: Install a tee to create a tap point on your existing lateral line.
-
Assemble the swing joint:
- Start at the tee, either insert a street elbow or thread in a MPT elbow.
- Cut a piece of Blu-lock pipe to the appropriate length (typically less than 12 inches)
- Push one end into the elbow—you'll feel it click into place
- Attach a second elbow or a swing joint elbow to the other end of the pipe
- Screw your sprinkler head onto the MPT fitting
That's it. No primer, no glue, no waiting—the connection is complete and can be pressurized immediately. The flexible Blu-Lock pipe allows the head to move slightly when bumped but keeps it positioned where you set it.
Step 4: Convert Sprinkler Zones to Drip Irrigation
One of the most impactful upgrades is converting appropriate zones from spray irrigation to drip. Trees, shrubs, vegetable gardens, and flower beds benefit enormously from the slow, targeted watering that drip provides.
How to convert sprinklers to drip irrigation:
- Identify suitable zones: Gardens, tree zones, and shrub beds are ideal candidates
- Install a Pressure Regulator: Drip works best at 25 psi, and the good drip pressure regulators include a filter to keep the system clean.
- Remove spray heads: Unscrew the existing heads from their risers or swing joints
-
Install drip manifolds: Thread a drip adapter directly into the existing riser
- Connect drip tubing: Run 1/2 in. drip distribution tubing from the manifold
- Place emitters: Position drip emitters near plant root zones
- Create closed loops: Connect the end of your drip line back to another manifold point for even pressure distribution
The beauty of this retrofit approach is that your B-hyve XR controller handles both sprinkler and drip zones seamlessly. Simply update the zone settings in the app to "drip irrigation" and the smart watering algorithms automatically adjust timing and frequency for deep, slow watering.
Pro tip: When you retrofit a sprinkler system to drip, use Drip-Lock to connect the pipes and emitters. Drip-Lock uses the technology as Blu-Lock so you can cut, push, and go!
Step 5 (optional): Add New Zones for Better Coverage
If your assessment revealed coverage gaps or you want to separate landscape areas for more precise control, adding sprinkler zones is straightforward with your new system.
To add a sprinkler zone:
- Run a new valve wire: From your B-hyve XR controller to the location of your new valve
- Install the zone valve: Place a 24 VAC electric valve on your main line
- Connect the valve wire: Attach to the next available terminal on your controller (terminals 1-16)
- Build out the new zone: Using Blu-Lock fittings and pipe, create your lateral lines and head connections
- Configure in the app: Add the new zone in your B-hyve app with appropriate settings
The ability to easily add zones transforms how you manage your landscape. Instead of watering sunny and shaded areas together, or combining drought-tolerant plants with water-hungry lawn, you can fine-tune each zone's schedule independently.
Pro Tip: Use the Valve Manifold System by Orbit to quickly build or change your valves! As an added bonus, the Valve Manifold System fits great in the Valve Box Base.
Step 6: System Test and Calibration
With all hardware upgraded, run a comprehensive system test:
- Manual zone tests: Use the B-hyve app to run each zone for 5-10 minutes
- Check for leaks: Walk the entire system looking for wet spots or spraying fittings
- Verify coverage: Confirm the sprinklers provide Head-to-Head coverage. You want the water from one sprinkler to touch the sprinkler(s) next to it.
-
Calibrate run times: The B-hyve app helps you set appropriate run times based on:
- Sprinkler precipitation rate
- Soil type
- Sun exposure
- Plant type
- Enable smart features: Turn on WeatherSense to let the controller automatically adjust for rainfall, temperature, and humidity
The B-hyve catch cup test (catch cups sold separately) gives you precise precipitation rate data to input into the system for your distribution uniformity. Distribution uniformity is like a grade for your sprinkler system. You want it to be between 55% and 80% higher is better, but very few systems are above 90%.
Get Started with Orbit's Retrofit Solutions
Upgrading your old sprinkler system into an intelligent, efficient, wireless irrigation system is one of the best investments you can make in your property. The combination of B-hyve smart controllers and Blu-Lock fittings for HDPE pipe means you'll spend less time on installation and repairs while enjoying superior performance.
Sources:
- EPA WaterSense, "Water-Efficient Landscaping"
- Irrigation Association, "Smart Water Application Technologies"
- Family Handyman, "Sprinkler System Maintenance Tips"