


Draw Sprinkler Head Locations
How to Draw Sprinkler Head Locations for Your DIY Irrigation System
You've measured your property and drawn your layout. You've tested your soil and selected your sprinkler heads. Now comes the fun part—drawing where those sprinklers will go. This step makes or breaks your system. Get it right, and you'll have a green, healthy lawn. Get it wrong, and you'll have brown patches and water waste.
Why Sprinkler Head Placement Matters
Poor sprinkler placement causes three big problems.
- First, you'll see dry patches in your lawn where water doesn't reach.
- Second, you'll waste water spraying sidewalks, driveways, and your neighbor's yard.
- Third, you'll use more water trying to fix the dry spots, which drives up your water bill.
Good placement gives you even coverage. Every part of your lawn gets the right amount of water. No dry spots. No runoff. No waste.
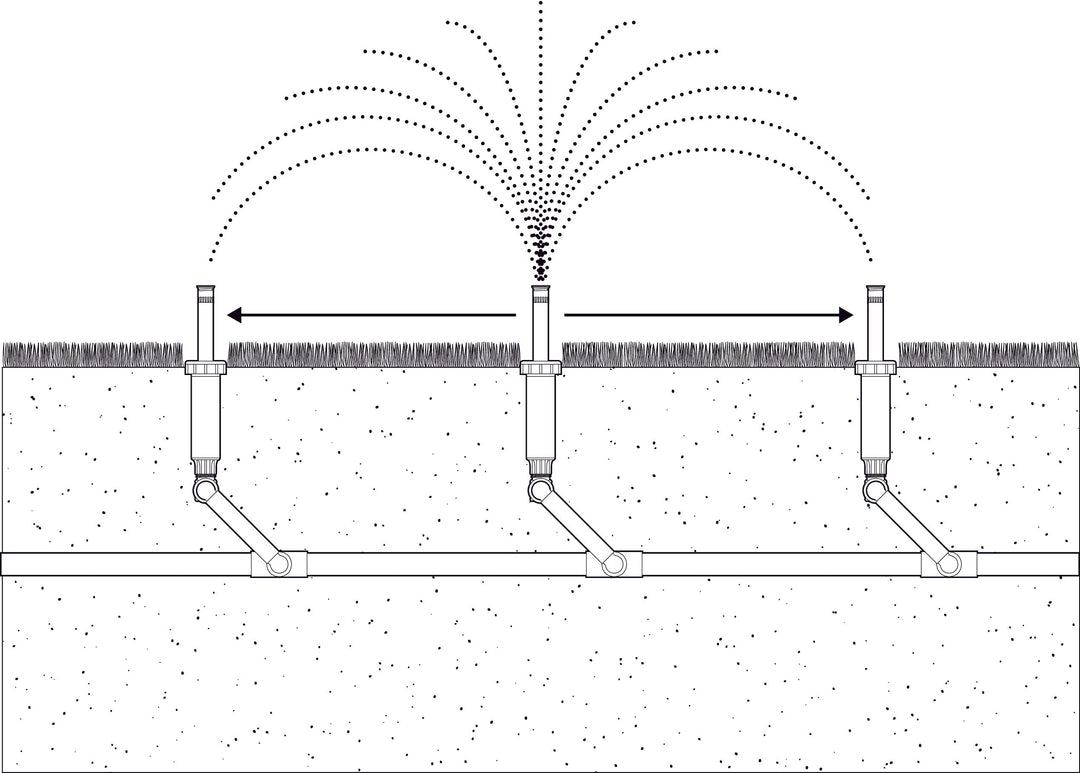
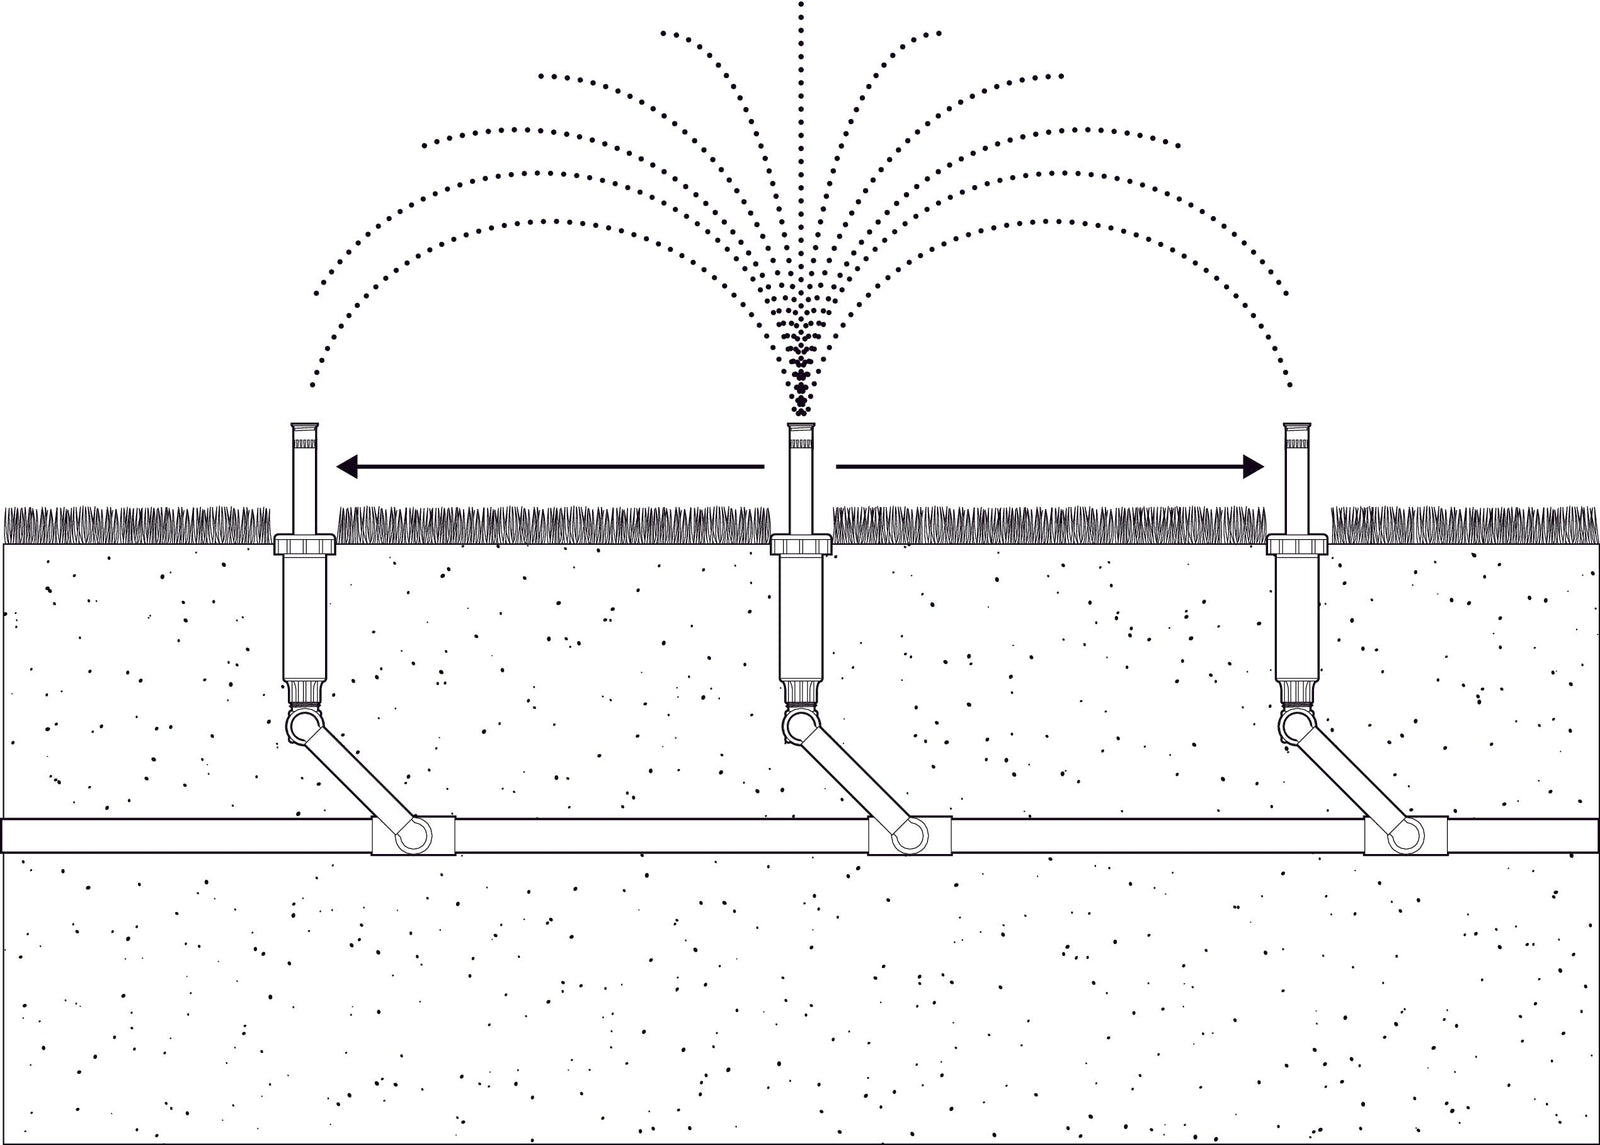
The secret is head-to-head coverage. Each sprinkler should spray all the way to the next sprinkler. When you look at your drawing, the spray patterns should overlap. This overlap makes sure every spot gets watered evenly.

Tools You Need for Drawing Head Locations
You'll need a few basic tools:
For Manual Drawing:
- Your property drawing on graph paper
- A compass (the kind that draws circles)
- A ruler
- A pencil with eraser
- Colored pencils (optional, but helpful)
The Easier Way:
Instead of drawing by hand, use Orbit's Online Sprinkler System Designer at design.orbitonline.com. The tool does all the measuring and spacing for you. Just upload your property info, and it places the sprinkler heads automatically. You can still adjust them if needed, but the hard work is done. We'll cover the manual method first so you understand the process, then show you how the online tool makes it simple.
Understanding Head-to-Head Coverage
Before you start drawing, you need to understand what good coverage looks like.
Imagine standing at one sprinkler head. That head should spray water all the way to the sprinkler heads next to it and across from it. When you draw this on paper, the spray circles should touch the center of circles next to them and overlap.

Good Overlap Example: When you draw the spray pattern circles, each circle should reach all the way to the center of the circles next to it. The coverage looks like a flower pattern where the petals overlap significantly. You'll see multiple circles crossing over the same spots.

Bad Coverage Example: If the circles only touch at the edges or have gaps between them, you'll see empty space that doesn't get enough water. This creates dry spots in your lawn. No amount of watering will fix this—the heads are just too far apart.
Step 1: Place Heads in Corners
Start with the corners. These are your anchor points.
Draw a quarter-pattern sprinkler (90 degrees) in each corner of your lawn or planting area. Use your compass to draw an arc showing where that sprinkler will spray water. The arc should follow the spray radius for your chosen sprinkler type.
For example, if you selected 15-foot spray heads, set your compass to 15 feet on your graph paper scale. Put the compass point on the corner and draw the quarter-circle arc.
Mark each corner head clearly. You can use a small circle or square symbol to show where the actual sprinkler will sit.
Step 2: Add Perimeter Heads
Now look at your corner heads. Do the spray patterns reach each other along the edges? If not, you need to add heads along the perimeter.
Place heads along each side of your property. Space them so each head sprays to the next one along the edge. This is head-to-head spacing along the perimeter.
Draw the spray pattern for each perimeter head. You'll use half-pattern heads (180 degrees) along straight edges. The arcs should touch or overlap the sprinklers in the corner and with each other.
Keep checking your spacing. Measure the distance between heads. For 15-foot spray heads, the maximum distance between heads should be about 15 feet (head-to-head). Closer is fine. Farther creates gaps.
Step 3: Fill in the Middle
Now check if your perimeter heads spray all the way across to the heads on the opposite side.
You need to add full-circle heads in the middle. Here's an easy way to find where they go:
Draw straight lines from perimeter heads on one side to perimeter heads on the other side. These grid lines help you see where the middle heads should sit. Place full-circle heads where these lines cross or where you see gaps in coverage.
Use your compass to draw the spray pattern for each middle head. The circles should overlap with the center of the perimeter heads and with each other. You're creating a web of overlapping coverage.
Spacing Guidelines for Different Sprinkler Types
Large Area Sprinklers: Space these 25 to 52 feet apart. These include Voyager gear-drive rotors and impact sprinklers that cover big lawns.
Medium Area Sprinklers: Space these 15 to 25 feet apart. These include Saturn and Titan gear-drive rotors and some impact sprinklers that cover medium areas.
Small Area Spray Heads: Space these 4 to 15 feet apart. These pop-up spray heads work for smaller yards and planting beds.
Along Hard Surfaces: Place heads 6 to 12 inches from sidewalks, driveways, curbs, and fences. Sprinklers can overspray their target by up to a foot, especially on windy days. This setback keeps water on your lawn instead of wasting it on pavement while still providing good coverage to the edge. The extra distance also protects heads from damage by foot traffic or lawn equipment. Check your local building codes—some areas have specific setback requirements for sprinkler heads near walkways.
Never mix large and small sprinklers in the same area. They use different amounts of water and run for different lengths of time. Keep them separate.
Special Situation: Narrow Strips
Narrow strips need special handling. These are the sections along sidewalks, between your house and driveway, or along fence lines.
For strips about 5 feet wide, use strip-pattern spray heads. These have a rectangular spray pattern instead of a circle. Space them evenly down the center of the strip.
Place the strip heads down the middle of the narrow section. Draw straight lines showing the rectangular spray pattern on both sides.
Special Situation: Curved Areas
Curves can be tricky, but there's a simple solution. Break the curve into short straight sections.
Look at your curved flower bed or lawn edge. Instead of trying to follow the exact curve, treat it like several short straight lines connected together. Place sprinklers along these imaginary straight sections just like you would for a regular straight edge.
Use quarter-circle and adjustable heads at the corners where the curve changes direction. Orbit offers adjustable pattern spray nozzles that work perfectly here. Models like the 53584L (15-foot adjustable pattern) and 53582 (10-foot adjustable pattern) let you dial in exactly the coverage you need. These nozzles adjust from 0 to 360 degrees, so you can set them for odd angles.
The key is using heads with adjustable arcs. Standard fixed-pattern heads often overspray curves. Adjustable nozzles let you fine-tune the coverage to match the exact shape of your planting bed.
When you draw curved areas, your spray arcs might look a bit irregular—that's normal. Focus on making sure the arcs overlap and cover the entire curved area without spraying outside the boundary.
Tips for Drawing Clean, Accurate Layouts
Use light pencil marks first. You'll probably need to adjust head positions as you go. Light marks erase easily.
Check your scale. If your drawing is 1 inch equals 10 feet, make sure your compass measurements match this scale.
Mark spray directions. Draw a small arrow showing which way adjustable heads point. This helps during installation.
Label head types. Write next to each head what type it is: quarter-circle, half-circle, full-circle, or adjustable. You can also note the spray radius (10-foot, 15-foot, etc.).
Color code zones. Use different colored pencils for different watering zones. This makes your drawing easier to read.
Double-check coverage. After you place all heads, look for any spots where the spray circles don't overlap. These will be dry patches.
The Smart Alternative: Use Orbit's Online Designer
Here's the truth: manual drawing takes time and skill. You need to get the spacing perfect, account for overlaps, and adjust for odd-shaped areas. It's easy to make mistakes.
Orbit's Online Sprinkler System Designer at design.orbitonline.com does this work for you. The tool:
- Places sprinkler heads automatically based on your property layout
- Ensures proper head-to-head spacing
- Adjusts for corners, edges, and curved areas
- Shows you exactly what coverage you'll get
- Creates a complete shopping list of Orbit products you need
You can still fine-tune the placement if you want, but the software handles the technical spacing requirements. This saves hours of measuring and erasing and redrawing.
The online designer uses the same professional irrigation design principles we've covered here. It just does the calculations faster and more accurately than drawing by hand.
Common Mistakes to Avoid
Spacing heads too far apart. This is the number one problem. When you try to save money by using fewer heads, you create dry patches. Follow head-to-head spacing rules.
Mixing sprinkler types in one area. Don't put spray heads and rotors in the same lawn area. They apply water at different rates and need different run times.
Forgetting about obstacles. Trees, bushes, and structures block spray patterns. Adjust head placement to work around obstacles, or plan to use more heads.
Ignoring property boundaries. Make sure heads near sidewalks and driveways point away from these areas. Orbit's adjustable nozzles let you reduce the spray distance by up to 25 percent to avoid overspray.
Not planning for future growth. Young trees and shrubs are small now but will grow. Think ahead about what will block your sprinklers in a few years.
What's Next
Now you have sprinkler heads drawn on your property layout. You can see exactly where each head goes and what area it covers. This drawing becomes your installation guide.
The next step is creating Hydraulic or watering zones. You'll group these heads into zones based on your available water flow and pressure. Each zone will connect to one valve, and all heads in that zone will run together.
But you don't have to figure out zones by hand either. The Orbit Online Sprinkler System Designer handles zone planning automatically. It calculates your water capacity, groups heads efficiently, and creates a complete system plan ready for installation.
Ready to see your system come together? Visit design.orbitonline.com and let Orbit's professional design tools do the heavy lifting. You'll have a complete irrigation plan in minutes instead of days.