


How to Use Our Landscape Irrigation Planning Designer

Before we start, we want to mention our amazing online sprinkler design tool: the Orbit Sprinkler System Designer. This tool allows you to create an online sketch of your property.
As you’ll see, the process of planning a sprinkler system can be a worthwhile challenge. It requires time and accuracy. We’ve seen countless times how a small mistake—a bad measurement, a misplaced head, or forgetting a feature of your garden—can result in a bad plan (which, if not caught before installation, can cost hundreds of dollars in supplies and labor to replace).
The Orbit Sprinkler System Designer (OSSD) can make this step very simple. Just upload a bird’s-eye picture of your property (which can usually be obtained online through Google Maps or similar programs) and then trace over it. You’ll only need to measure one item of your yard, like the width of your driveway, for scale and the computer does the rest. Once you’ve finished tracing and drawing (it usually takes about 30 minutes) the system will ask for the water flow information you collected in last week's blog and, bingo, you’re done. The computer will do the calculations and give you a plan for placing heads, valves, and zones in ideal locations. OSSD will even give you a comprehensive parts and estimated price list of all the supplies you’ll need. You also are able to print a detailed, customized guide for installing the sprinkler system, down to the placement of every pipe, every sprinkler head, and every nozzle. Oh, and it’s totally, completely, 100% free! Yeah, it’s a pretty great tool and we’re quite proud of it. We encourage you to give it a shot.
For those who are able to find success with the sprinkler design system, the rest of this post will be more about sprinkler theory and why things are done the way they are. For those going the old fashioned way, pay close attention to what follows.
Theory and Best Practice
Irrigation systems work in funnels; well, reverse funnels is probably a better description. At the top you’ve got your main water line connection. This usually comes from the municipal water system, but for some people a well is used or even, in rare cases, pumps from some freshwater source like a river or lake. But the Average Joe is connecting to his city’s water line.
From the water source, the water travels to your valve box containing a manifold and several valves. Of course, your water may be required by local code to pass through such things as a backflow prevention device, but the basic premise is water comes from the main line, passes through the manifold, and then flows out through a valve to the watering zone. Each zone contains a number of sprinkler heads, which is determined by your available water flow. Sprinkler heads are the mechanisms you see spraying the water on your lawn. There are various types of heads, each with a specific purpose, and we’ll get to that in a bit.
There are many approaches you could take in deciding the number of zones, type of heads, and watering means you will use, but the question that should guide all your choices is, "How can I effectively water all areas of my yard using the least amount of water?" This is where the savings will really come from, because no matter what kind of system you put in, it will generally pay for itself if you maximize efficiency. So, make watering efficiency and conservation your target and you’ll get where you need to go.
Head types
There are a plethora of head types used in irrigation systems. Let’s talk about each, their pro’s and con’s and where you might use them.
Medium Area Sprinkler Heads

The most common sprinkler head is the pop-up. They come in a number of sizes, but the basic premise remains the same: the water forces the interior of the sprinkler to pop up and spray water in a pattern through interchangeable nozzles. Pop-ups are fabricated to spray at different distances, which you will choose based on your yard layout. Adjustable nozzles used on pop-up sprinklers can spray anywhere from 4–19 ft. They are great because they are inexpensive, reliable, and easy to repair. The nozzles screw on and off, letting you choose the one that best suits head placement. They are great for watering the average lawn and errors can be easily detected.
Pop-up sprinkler heads aren’t perfect though, and there are situations where they may not be ideal. Pop-ups are the carpet-bombing of sprinklers; they’re not precision instruments. Now, when you’re watering your lawn, this isn’t a big deal—in fact, it’s what you want—but for watering flower beds, gardens, trees, pots, or anything that doesn’t cover an expansive area of ground, pop-ups aren’t the best choice. The advantages of using pop-up sprinkler heads are the ease of use, even watering patterns, and affordability.
Large Area Sprinkler Heads (Rotors)
There are two types of large area heads, impact and gear drive. As their name implies, these sprinklers are effective in covering large areas of turf. Impact heads are familiar to us because of the recognizable ratcheting noise they make as they go back-and-forth.

Gear drive sprinkler heads are a relatively new product in the sprinkler line-up. These are very quiet in their operation, and emit a single stream of water. Their superior area coverage means you don’t have to install as many sprinkler heads. These heads are adjustable, allowing you to adjust the spray distance (how far the water goes) and the radius (how wide the arc of the head is). Their closed case design resists clogging from grit, sand, and heavy grasses.

Remember, rotors aren’t ideal for small patches of land. They cost more and repairs can be a more intricate and may even require changing the entire head. Finally, rotors require higher water pressure. When considering rotor sprinklers it’s important to determine if your area meets these requirements If so, you'll be pleased with the outcome.
Eco-Stream Rotator (Rotary)

The pop-up Eco-Stream Rotator Sprinkler Head is a hybrid between pop-ups and rotors. Often called the rotary sprinkler, it looks like a popup, but behaves like a handful of gear drives being sprayed in a kaleidoscope pattern. Further, they offer the adjustability of rotors with the effectiveness of popups. Other benefits include use with lower water pressures where gear drives cannot be used. There is also evidence suggesting that rotary sprinkler water coverage is superior to popups. They are also easy to install and repair. These are best for medium sized watering areas.
What head you use will be determined by the size of the watering area. For areas larger than 25’ x 25’, you’ll want to use large area sprinklers (either gear driven or impact heads). Areas smaller than 25’ x 25’ will use popups (either traditional or rotary). For flower beds, shrubs, ground cover, etc. you’ll want to use small area sprinklers, drip, or soaker lines.
The Garden
Gardens and flowerbeds require a different approach to watering. Pop-up, gear drive, and impact sprinkler heads work great for the lawn but they aren’t precision instruments. These will work well if you have a lot of ground cover, but what if your beds just have shrubs, flowers, etc.? For those plants, drip irrigation is an excellent choice because it’s easy to install and maintain, its flexibility in a changing garden is unmatched, and it’s efficient. We will talk more about this awesome option in a later edition of our blog, but be aware that using drip irrigation can save on your water bill and water your plants more efficiently and directly.
Head Placement
Head placement is perhaps the most important part of making sure your system is effective and efficient. A term to become familiar with is head-to-head coverage. This concept is demonstrated in the graphic below.
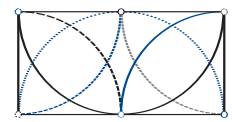
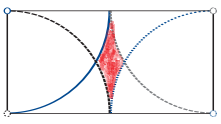
This pictures shows excellent head-to-head coverage. Head-to-head coverage means the water from one head extends all the way to the next head. It provides even spacing and excellent water coverage of the area, ensuring no dead spots result. Now many have complained that this seems like double watering, but not so. The lawn in the example above will be watered efficiently without missing any spots, but below is an example of bad coverage which misses the center area (the part in red). Notice that there are no heads place along the center of the perimeter, but only in the corners.
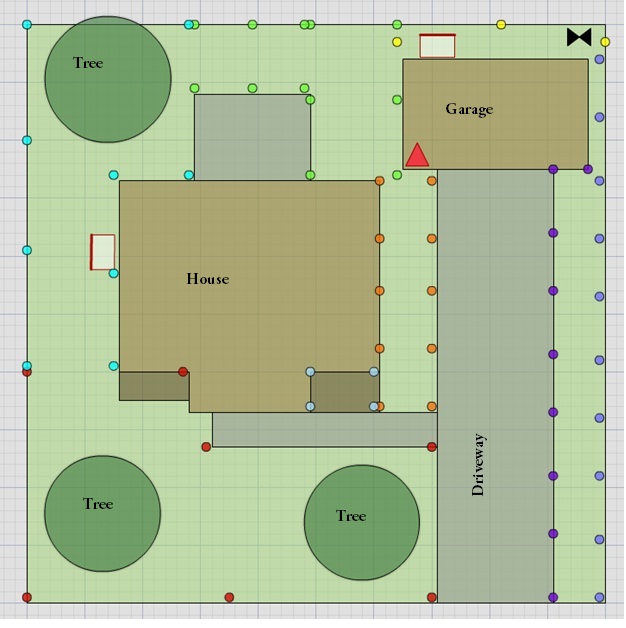
Here’s our example yard where we’ve placed our heads:
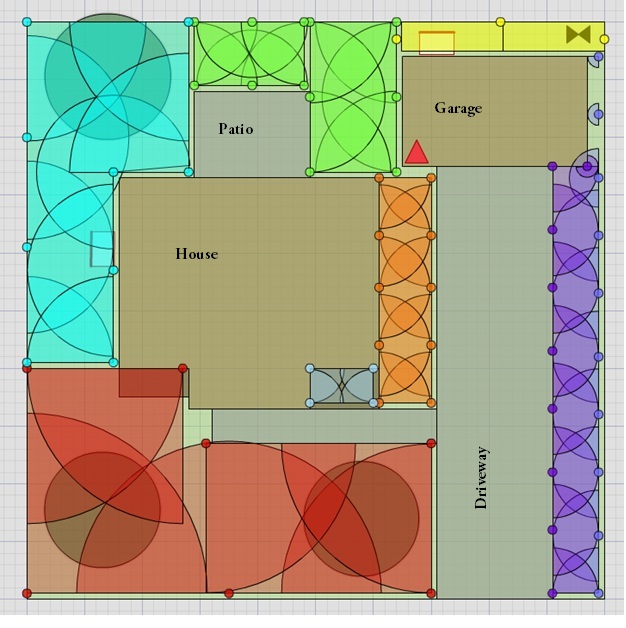
And here’s what the spray patterns will be:
The Zones
Once you’ve placed your heads you are ready to create your zones. This part can be tricky and requires a bit of math. Group plant types into specific zones. By this we mean that grass, flowerbeds, grow boxes, etc. should all be separated into their own zones. This is because each plant type has different water requirements.
Warning! Heads of different types (rotors vs. pop-ups) cannot be combined in the same zone. This goes for drip and shrub sprays as well. Things have to be the same because each type of head has different GPM requirements and output. If you combine different head types in the same zone, you won’t be able to evenly distribute water; some places will get over watered, some under watered.
You’ll need to know how much water is coming through your valve (which we showed you how to find in the previous blog). In this example, it’s 15 GPM. Next, you’ll determine the GPM of each head—this is determined by the head and nozzle—and write this information next to the corresponding head on your plan. When you’re done, it will look something like this:
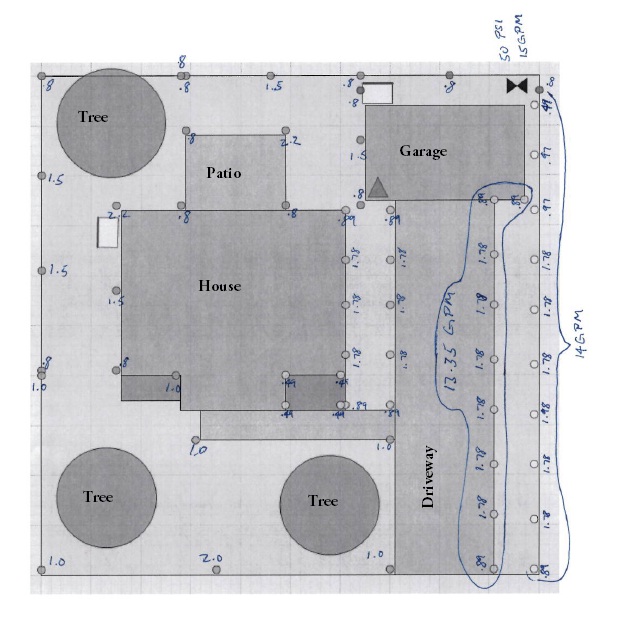
Knowing these two things, you can begin to group your heads into zones. When mapping out the zones, it’s important to provide sufficient water pressure to each zone. All the heads in the zone combined must be using at or below the total available water flow (GPM). You might even want to step it down by 1-2 GPM just to make sure there is enough water in the case of a drop in pressure. Note how we’ve grouped the two zones on the right in the example above. They don’t exceed the total GPM of our main line (14 GPM and 13.35 GPM). We’ll do the same with the other zones.
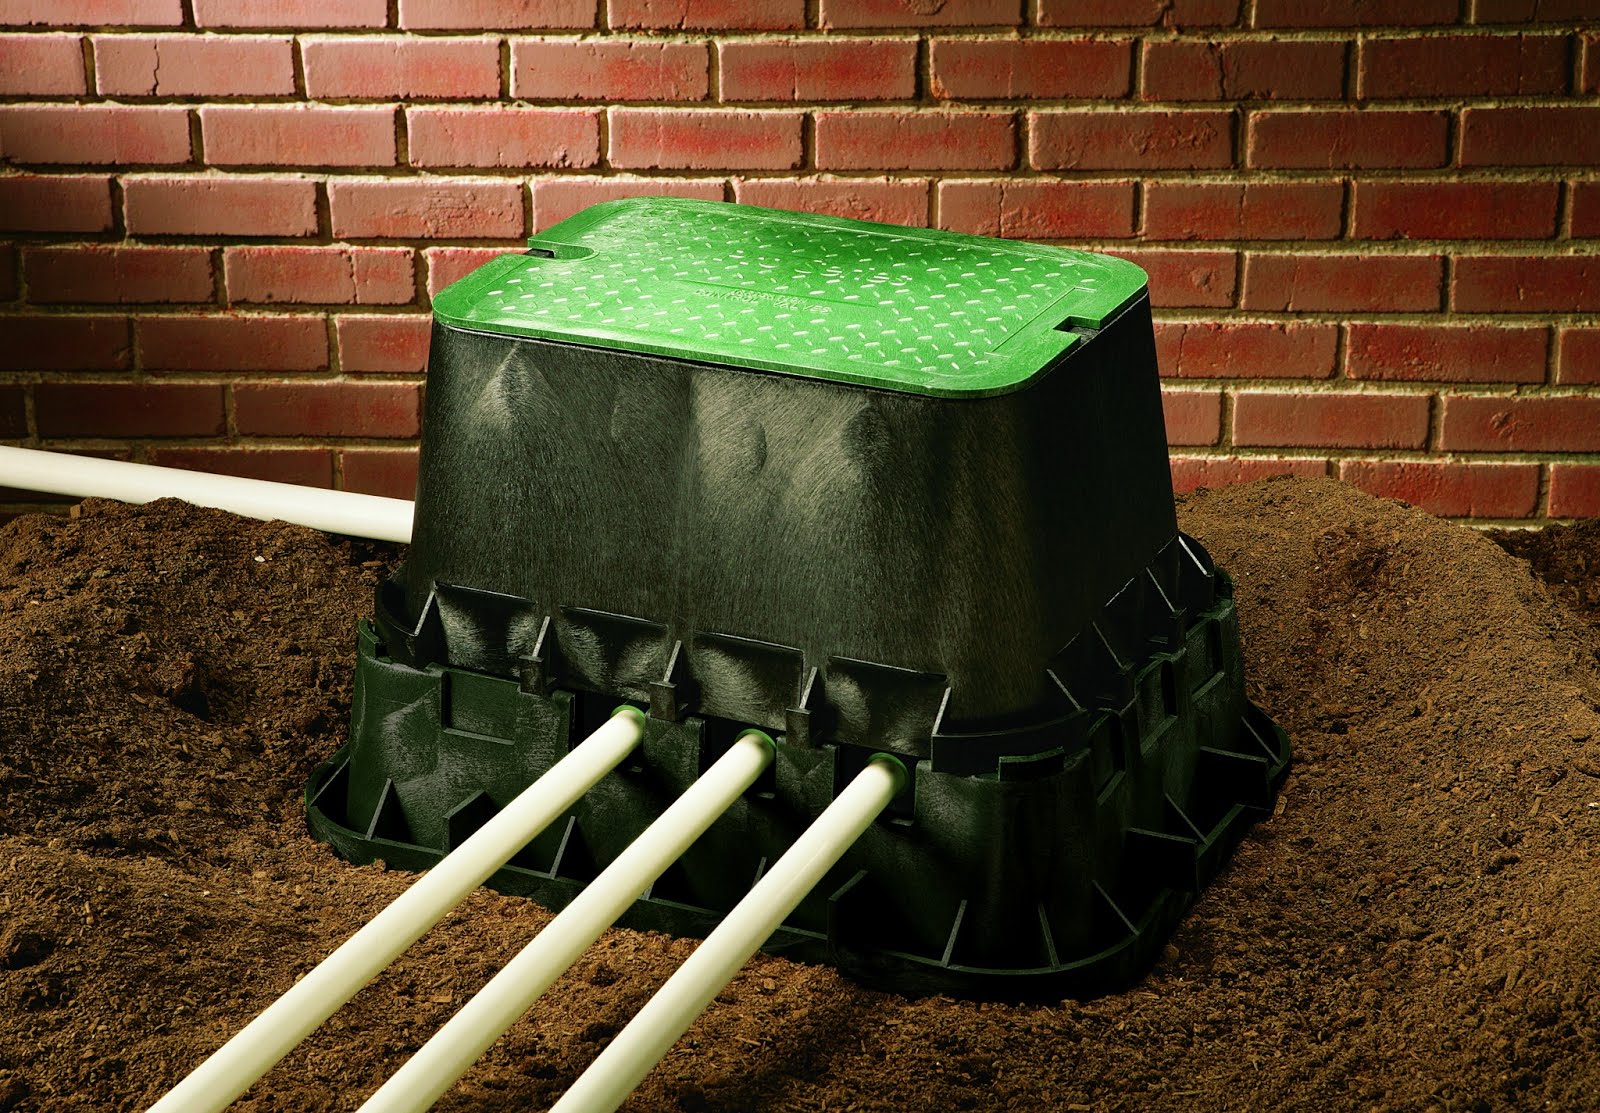
Manifold Placement
Zones connect to valves, which are grouped together in a valve box, where they connect to the main water line. These boxes usually can hold up to four–six valves. Placement is a matter of preference, but there are few things to take into account when deciding where to put your valve boxes.
First, grouping is a good idea so you can daisy chain the main line. The main line from your water source is the most expensive run of piping that you’ll lay, so it’s best to keep these runs short. Of course, we don’t recommend putting all your boxes in the front yard, but you don’t want to space boxes all over the yard either.
Another consideration is making sure your boxes are easy to access. When you’re having problems with your sprinklers—which will inevitably happen—there’s nothing more frustrating than having to poke around in difficult to reach places behind rose bushes or under trees. A better option is to have the boxes in a clear location where you can work in them with ease. Admittedly, the caps can clash with the aesthetics of yard but options, such as faux rocks, can blend the boxes with your landscape.

So, there you have it. We've covered the basics of sprinkler theory, sprinkler head types and placement, as well as manifold placement.

