
Expert Support
Available via chat

Orbit offers a complete lineup of gear drive sprinklers (also known as rotor sprinklers) with spray distances from 15 to 52 feet. All of Orbit's gear drive units offer easy sprinkler head adjustment with patterns from 40 to a full 360 degrees. In addition to simple distance adjustment, each gear drive rotor also has a precision filter to prevent dirt or debris in the water system from clogging your nozzles.
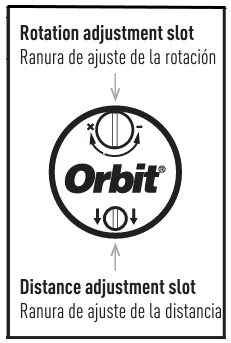
Below, we explain how to adjust a gear drive (rotor) sprinkler with a pattern adjustment screw, featuring the Orbit Saturn III® Gear Drive Sprinkler.
PRE-SET THE ROTATION
Saturn III® rotor sprinklers are preset to rotate approximately 40°. Sprinkler head adjustment may be made with water on or off. It is recommended that the initial adjustment be made before installation.
To Increase the Spray Pattern
To Decrease the Spray Pattern
Adjusting the Distance
Insert a screwdriver into the distance adjustment slot (Fig. 2). Turn the screw clockwise (into the stream of water) to decrease the distance or counterclockwise to increase the distance. (Do not rotate the screw too far counterclockwise or the nozzle or screw may come out). This type of sprinkler head adjustment allows for fine-tuning your coverage area.
Lifting the Riser
With the water turned off, you can manually lift the riser for maintenance or sprinkler head adjustment. If needed, insert a screwdriver into the lifting slot and pull upward.
Warning: To avoid pinching hands or fingers, release the riser with caution.
With its easy adjustability, durability, and versatility, and its smooth and quiet operation, Orbit's Professional Gear Drive makes the ideal choice for your yard. The rotor design provides excellent coverage for medium to large areas with minimal sprinkler head adjustment needed once properly set.

Below, we explain how to adjust a gear drive (rotor) sprinkler with a pattern adjustment key, featuring the Orbit Saturn IV Gear Drive Sprinkler. This rotor system offers professional-grade performance with user-friendly adjustment features.
Set the pattern before installation: The Saturn IV rotor can be set to rotate between 40° and 360° (preset at 40°)
1. Turn the top of the head all the way to the left until it stops and then all the way to the right. The top of the head must be in this position to make pattern adjustments for proper sprinkler head adjustment (Figure 1).

2. Insert the plastic end of the key into the pattern adjustment hole for precise sprinkler head adjustment (Figure 2).

3. Turn clockwise to increase rotation; counterclockwise to decrease rotation. Each full turn increases/decreases rotation by 90˚ for easy sprinkler head adjustment (Figure 3).

Set the spray distance after installation
Caution: DO NOT turn the adjustment screw too far in either direction---screw may come free of threads during sprinkler head adjustment.
{"one"=>"Select 2 or 3 items to compare", "other"=>"{{ count }} of 3 items selected"}