


How to Adjust Orbit Sprinkler Heads
Here at Orbit, sprinkler heads and lawn irrigation are what we do best. Learn how to make adjustments to your sprinklers today.
Quick Answers for How to Adjust a Sprinkler Head:
- Can I adjust my sprinkler while water is running? Yes, most sprinkler head adjustments can be made with water on or off, though some are easier to see with water flowing.
- What's the difference between a rotor and a spray head? Rotors (also called gear drive sprinklers) rotate and cover larger areas, while spray heads create a fixed spray pattern.
- Do I need special tools to adjust a sprinkler head? Basic sprinkler head adjustment typically requires only a screwdriver, though specialized tools can make the job easier.
- How to adjust pop up sprinkler heads? Basic pop-up sprinkler head adjustment typically requires only your hands. Fixed patterns can be adjust by replacing the nozzle or turning the stem. Adjustable patterns can be adjusted by turning part of the nozzle.
Our Sprinkler Head Types:
Understanding your sprinkler type is the first step when learning how to adjust a sprinkler head properly. Each type of sprinkler requires different adjustment techniques:
- Impact Sprinklers
- Gear Drive (Rotor) Sprinklers with a pattern adjustment screw
- Gear Drive (Rotor) Sprinklers with a pattern adjustment key
- Adjustable Pop-Up Sprinklers with Brass or Plastic Adjustable Nozzles
Recommended Tools for Sprinkler Head Adjustment:
How to Adjust your Impact Sprinkler
Impact sprinklers are a reliable choice for watering large areas and are known for their durability and ease of adjustment. When learning how to adjust an impact sprinkler, you'll find they maximize coverage and are beyond easy to adjust for distance and spray pattern, making them ideal for DIY homeowners who want straightforward maintenance.
For lower pressures, plastic impact heads work great, however, they lack the durability of stronger metal impact heads. Impact sprinklers are particularly effective for larger lawn areas where rotor-style coverage is needed.
PLEASE NOTE: For water pressure less than 15 PSI an impact head will not function properly. Other sprinkler types should be considered.
Quick Answers for How to Adjust an Impact Sprinkler:
- How do I reduce the watering distance? Turn the deflector knob or diffuser screw clockwise
- How do I get full circle coverage? Flip the trip lever up
- Can I water just part of a circle? Yes, push the trip lever down and adjust the trip stops
So how do you optimize your impact sprinkler's performance? Here are some easy ways to learn how to adjust an impact sprinkler for distance and spray pattern through proper techniques.
Adjusting the Distance:
Follow along using the diagram below for precise sprinkler head adjustment.
A. Adjust distance with deflector knob: Simply turn the deflector knob to adjust the shield into the stream to reduce water coverage. This is one of the quickest sprinkler head adjustment methods.
B. Adjust the distance with the Diffuser Screw: Use the diagram to locate the diffuser screw, then simply rotate it. Turning clockwise into the stream will reduce the distance. Turning counterclockwise will increase the distance.
If connected to a hose, adjust the distance with water flow:
The simplest solution is to turn your faucet up higher or lower. Just twist and shout!
Adjusting the Spray Pattern:
First, use the diagram below to locate the trip lever for effective sprinkler head adjustment.
- Adjust the spray pattern with the Trip Lever & Trip Stops:
- Full Circle = Trip Lever Up! Simply flip-up the trip lever to create a full 360-degree pattern.
- Partial Circle = Trip Lever Down! Push the trip lever to the down position.
- Partial Circle Adjustment = Trip Stops! Slide the trip-stops to adjust to any portion of a 360-degree circle. (Pro tip -- make sure the trip lever is on the outside of the trip-stops). Happy watering!
Diagram of Impact Sprinkler with Deflector Knob
How to Adjust a Gear Drive (Rotor) Sprinkler with a pattern adjustment screw
Orbit offers a complete lineup of gear drive sprinklers (also known as rotor sprinklers) with spray distances from 15 to 52 feet. All of Orbit's gear drive units offer easy sprinkler head adjustment with patterns from 40 to a full 360 degrees. In addition to simple distance adjustment, each gear drive rotor also has a precision filter to prevent dirt or debris in the water system from clogging your nozzles.
Quick Answers for How to Adjust a Gear Drive (Rotor) Sprinkler:
- What's the minimum spray pattern? 40 degrees
- Can I adjust with water on? Yes, but initial setup is easier with water off
- Which direction increases the pattern? Turn the adjustment screw clockwise
Below, we explain how to adjust a gear drive (rotor) sprinkler with a pattern adjustment screw, featuring the Orbit Saturn III® Gear Drive Sprinkler.
PRE-SET THE ROTATION
Saturn III® rotor sprinklers are preset to rotate approximately 40°. Sprinkler head adjustment may be made with water on or off. It is recommended that the initial adjustment be made before installation.
- Using the palm of your hand, rotate the nozzle turret counterclockwise to the left stop to complete any interrupted rotation cycle (Fig. 1). This ensures proper starting position for sprinkler head adjustment.
- Rotate the nozzle turret clockwise to the right stop. This is the fixed side of the spray pattern. The nozzle turret must be held in this position for all spray pattern adjustments. (Rotate the turret to test the spray pattern.)
To Increase the Spray Pattern
- Insert a flat-head screwdriver into the pattern adjustment slot (Fig. 2) for precise sprinkler head adjustment.
- While holding the nozzle turret at the right stop turn the screwdriver clockwise.
- Adjust to any spray pattern between 40° and 360°.
- The adjustment slot will stop turning when adjusted to the maximum spray pattern (360°). Do not try to force it past this stop.
To Decrease the Spray Pattern
- Insert a flat-head screwdriver into the pattern adjustment slot (Fig. 2).
- While holding the nozzle turret at the right stop, turn the screwdriver counterclockwise for accurate sprinkler head adjustment.
- Adjust to any spray pattern between 40° and 360°. The adjustment slot will stop turning when adjusted to the minimum spray pattern (40°). Do not try to force it past this stop.
Adjusting the Distance
Insert a screwdriver into the distance adjustment slot (Fig. 2). Turn the screw clockwise (into the stream of water) to decrease the distance or counterclockwise to increase the distance. (Do not rotate the screw too far counterclockwise or the nozzle or screw may come out). This type of sprinkler head adjustment allows for fine-tuning your coverage area.
Lifting the Riser
With the water turned off, you can manually lift the riser for maintenance or sprinkler head adjustment. If needed, insert a screwdriver into the lifting slot and pull upward.
Warning: To avoid pinching hands or fingers, release the riser with caution.
With its easy adjustability, durability, and versatility, and its smooth and quiet operation, Orbit's Professional Gear Drive makes the ideal choice for your yard. The rotor design provides excellent coverage for medium to large areas with minimal sprinkler head adjustment needed once properly set.
how to adjust Orbit Saturn 3 sprinkler heads (Version 1)

how to adjust Orbit Saturn 3 sprinkler heads (Version 2)
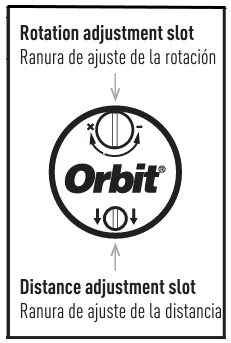
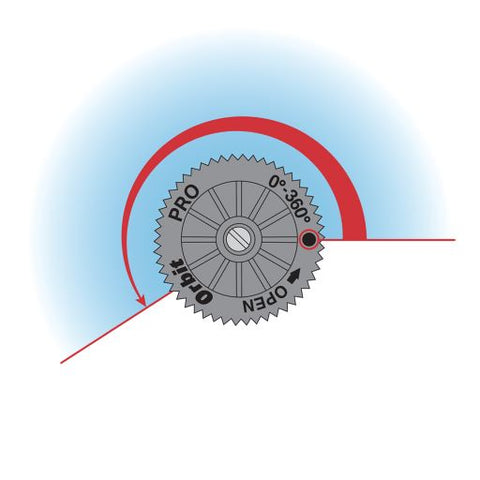
How to Adjust a Gear Drive (Rotor) Sprinkler with a pattern adjustment key
Below, we explain how to adjust a gear drive (rotor) sprinkler with a pattern adjustment key, featuring the Orbit Saturn IV Gear Drive Sprinkler. This rotor system offers professional-grade performance with user-friendly adjustment features.
Set the pattern before installation: The Saturn IV rotor can be set to rotate between 40° and 360° (preset at 40°)
1. Turn the top of the head all the way to the left until it stops and then all the way to the right. The top of the head must be in this position to make pattern adjustments for proper sprinkler head adjustment (Figure 1).

2. Insert the plastic end of the key into the pattern adjustment hole for precise sprinkler head adjustment (Figure 2).

3. Turn clockwise to increase rotation; counterclockwise to decrease rotation. Each full turn increases/decreases rotation by 90˚ for easy sprinkler head adjustment (Figure 3).

Quick Answers for How to Adjust a Gear Drive (Rotor) Sprinkler:
- How much does each turn change the pattern? Each full turn changes rotation by 90 degrees
- When should I set the pattern? Before installation for easiest access
- What if I lose the adjustment key? Contact Orbit customer service for a replacement
Set the spray distance after installation
- Set with water on under the system's normal operating pressure for accurate sprinkler head adjustment. Note: Preinstalled nozzle (#7) adjusts from 25 ft. to 45 ft. depending on system water pressure.
- Insert the hex (metal) end of the key into the distance adjustment slot (Figure 2).
- Turn clockwise to decrease distance; counterclockwise to increase distance.
Caution: DO NOT turn the adjustment screw too far in either direction---screw may come free of threads during sprinkler head adjustment.
How to Adjust a Spray Sprinkler (Adjustable Pop-Up Sprinkler Nozzle)
When learning how to adjust a spray sprinkler (also known as an adjustable pop-up sprinkler nozzle), whether plastic or brass, it's easiest to make your adjustments when the head is pulled up. The Orbit Spray Head Pull-Up Tool makes this job simple and is an essential tool for learning how to adjust a spray sprinkler efficiently.
Quick Answers for How to Adjust a Spray Sprinkler:
- Do I need to pull up the sprinkler head? Yes, when learning how to adjust a spray sprinkler, it's much easier to see and adjust when extended
- Which direction sets the right edge? Turn clockwise to set the right boundary
- How do I get 360-degree coverage? Twist the nozzle all the way to the left
- Extend the Stem: First, pull up the stem, then clamp at the base to hold it in place while making your sprinkler head adjustment.
- Adjusting the Spray Pattern: Turn the stem clockwise so the small dot (indicator) on the top of the nozzle lines up with the right edge of the area you want to water. Once you've got that set, hold the base of the nozzle, and twist the top of the nozzle counterclockwise so the small dot (indicator) lines up with the left edge of the area you want to water. If you twist the nozzle all the way to the left you will have a 360-degree spray pattern. This is a key step in how to adjust a spray sprinkler for precise coverage.
- Adjusting the Distance: The nozzle comes preset at the maximum spray distance. To decrease the spray distance when learning how to adjust a spray sprinkler, simply turn the metal screw in the center of the nozzle clockwise.
Troubleshooting Common Sprinkler Head Adjustment Issues
Quick Answers for Common Problems:
- Sprinkler won't rotate: Check for debris in the rotor mechanism or low water pressure
- Uneven spray pattern: Clean the nozzle and verify proper sprinkler head adjustment
- Short spray distance: Increase water pressure or adjust distance screw counterclockwise
- Gear drive rotor skipping: Check for debris and ensure proper lubrication
Regular maintenance and proper sprinkler head adjustment techniques will keep your irrigation system running efficiently for years. Whether you're working with impact sprinklers, gear drive rotors, or pop-up spray heads, following these guidelines will help you achieve optimal coverage and water conservation.
Visit "Learn & Grow" - The Orbit Blog for catch-all tips, tricks, and recommendations on sprinkler head adjustment and more.
For additional information and instructions reach out to our dedicated Customer Care Team at https://support.orbitonline.com
Last Updated: 2025 JUL 07

